A Potter’s Guide to Layering Mayco and AMACO Glazes
By Potterings Clay Studio in West Seattle, WA.
There is something magical about opening a kiln and finding a glaze that has done exactly what you hoped it would. The colors have melted into one another, the edges have softened, and a few perfect drips have found their way down the side of a mug. It almost feels like the kiln had a mind of its own.
Of course, there is a little more to it than magic.
Beautiful flowing glazes happen because certain glazes are designed to work together. Once you understand how they behave, layering glazes becomes much less about luck and much more about experimenting with confidence.
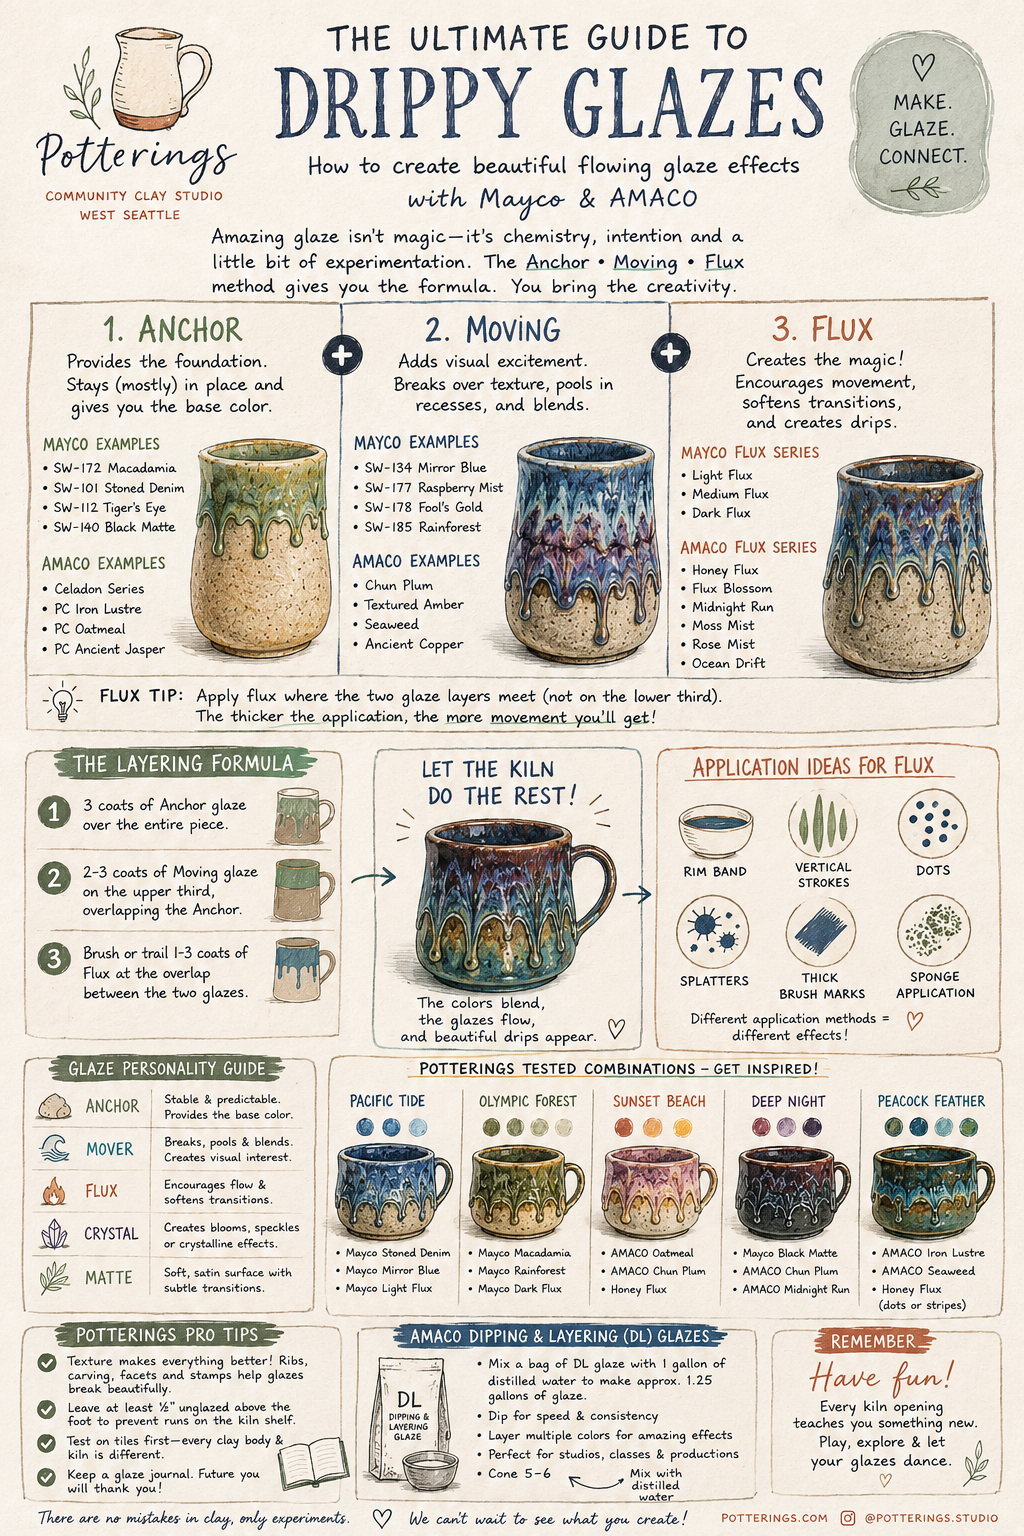
At Potterings, we like to think about glaze layering in three simple parts: Anchor, Moving, and Flux.
Instead of memorizing dozens of glaze recipes, learn what each glaze contributes to the finished piece. Once you understand that relationship, you’ll start creating your own combinations instead of copying someone else’s.
We use a variety of glazes, with over 70 choices (test tiles) for beginning potters to use and love. In this blog post we’re focusing on Mayco and AMACO as those are widely-used by many potters, us included.
Start with an Anchor
Every layered glaze needs a foundation.
An anchor glaze is the one that sets the stage. It provides the main color and usually stays close to where you brush or dip it. It doesn’t move very much in the kiln, which makes it the perfect backdrop for more active glazes.
Mayco’s Macadamia, Stoned Denim, and Tiger’s Eye are wonderful examples. If you’re working with AMACO, Oatmeal, Iron Lustre, and Ancient Jasper all make beautiful foundations.
Think of your anchor glaze like the canvas before the painting begins.
Then Add Some Movement
This is where things start to get interesting.
Some glazes seem almost alive in the kiln. They break over carved edges, collect in stamped textures, and blend into neighboring colors. We call these moving glazes because they create depth and variation without taking over the entire piece.
Mirror Blue, Raspberry Mist, and Rainforest from Mayco are favorites in our studio. AMACO’s Chun Plum, Seaweed, and Textured Amber all create wonderful movement for slightly different reasons.
If you’ve ever admired a mug where one color seems to fade effortlessly into another, chances are a moving glaze was part of the recipe.
Finally, Invite the Glaze to Dance
This is where flux comes in.
Flux isn’t just another color. It changes the way neighboring glazes melt during the firing. It softens transitions, encourages movement, and often creates those flowing drips that catch everyone’s eye.
The trick is knowing where to use it.
Rather than brushing flux over an entire piece, try adding it where two glazes overlap. Around the rim of a mug, across the shoulder of a vase, or in a few brush strokes over carved texture are all great places to begin.
A little flux creates subtle movement. A heavier application can produce dramatic waterfalls of glaze.
Gravity always gets the final say, so leave enough room above the foot of your piece to keep those beautiful drips off the kiln shelf.
Let the Kiln Finish the Story
One of the hardest lessons for new potters is learning that glazing isn’t finished when you put the brush down.
The kiln does the final work.
Heat changes everything. Colors soften, crystals develop, glazes begin flowing into one another, and combinations that looked ordinary before firing suddenly become extraordinary.
That uncertainty is part of what makes ceramics so addictive.
No two kiln loads are exactly alike.
Texture Makes the Difference
If you really want layered glazes to shine, give them something to work with.
Carved lines, stamped patterns, ribs, facets, and sprigs all create little hills and valleys for the glaze to move across. As the glaze melts, it naturally thins over raised areas and gathers in recesses, creating depth that simply isn’t possible on a perfectly smooth surface.
Sometimes the carving feels subtle before firing. After glazing, it becomes the star of the piece.
Don’t Be Afraid to Experiment
One of the biggest myths in pottery is that experienced potters know exactly what every glaze combination will do.
They don’t.
They simply test more often.
Every glaze manufacturer publishes beautiful recipes, and they’re a wonderful place to begin. But your clay body, firing schedule, glaze thickness, and even where a piece sits in the kiln all influence the final result.
That’s why we encourage every Potterings student to build a collection of glaze test tiles.
A small test tile can save a kiln shelf, but more importantly, it becomes part of your own glaze library. After a few months you’ll have something even more valuable than a recipe book. You’ll have a record of what works in your own studio.
Our Favorite Way to Layer
If you’re looking for an easy place to start, try keeping things simple.
Brush three even coats of your anchor glaze over the entire piece. Once it’s dry, add two coats of a moving glaze around the upper third of the form so the colors overlap naturally. Finish by brushing a little flux where those two glazes meet.
Then let the kiln do what it does best.
Sometimes you’ll get soft color transitions. Sometimes you’ll get dramatic drips. Sometimes you’ll discover a combination you can’t wait to use again.
That’s the fun of ceramics.
The Best Part Isn’t the Recipe
People often ask us for our favorite glaze combinations.
The truth is, our favorites are always changing.
Every new glaze, every new clay body, and every new firing creates another opportunity to discover something unexpected.
The goal isn’t to recreate someone else’s mug.
It’s to create one that couldn’t have been made by anyone else.
So grab a few glazes that catch your eye, make a handful of test tiles, and don’t be afraid to play.
Some of the most beautiful pieces in the studio started as experiments.
We hope you enjoyed this article, you’re welcome to save and keep our infographic. At Potterings each of our workshops and open studios includes a separate glazing session. Unique to our studio, you’ll come back after your piece is bisque fired (see our blog post here) to glaze yourself.
